

***Giveaway now closed -- congratulations Sarah@123quilt!***
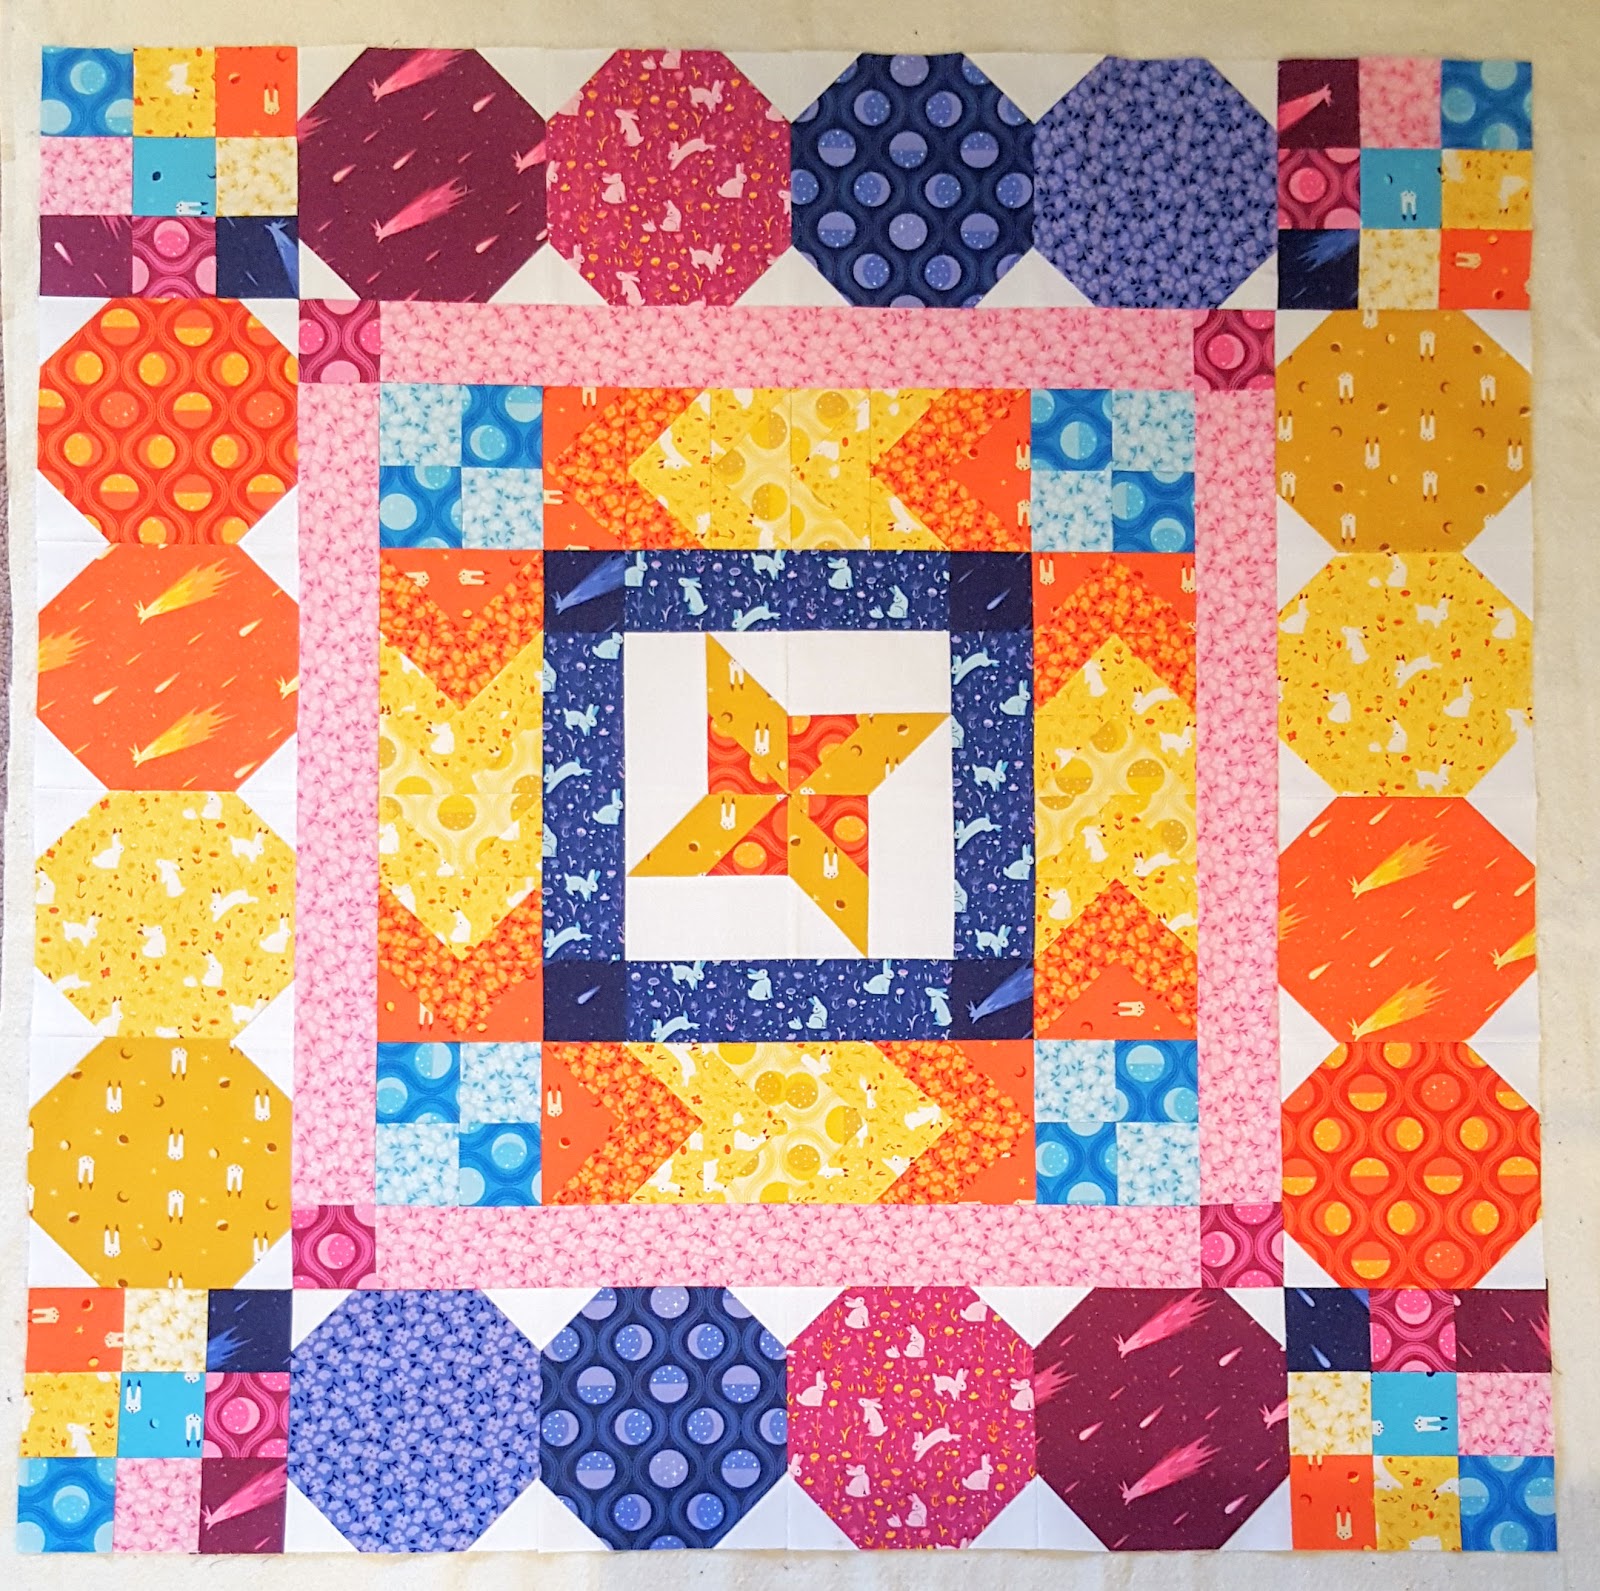
Last spring I was so happy to help out my friend Felice with her Quilt Market booth by making a mini medallion quilt using her Luna Sol collection. These prints just glow with saturated colors, astronomical wonders, and the cutest little bunny rabbits you've ever seen.

I promised that I would release a tutorial for that quilt, and here it is, ready at last -- just in time for her official fabric release tour!

If you've never tried making a medallion quilt before, this is a great way to get a feel for the style without committing to a full size quilt. The blocks are simple to make, and you can finish this project in a week or less depending on how much time you have to sew. Wouldn't this make a fun quilt for a little one? I used to let my baby girls play on small quilts about this size when they were tiny. How long ago those days seem now!
I would love it if you would share photos on Instagram if you sew one of these. Tag me @fabricmutt and tag your quilt #planetaryminimedallion. It's always so fun to see what people make from tutorials!
The best news, of course, is that Windham is giving away a fat quarter bundle of Luna Sol to one of you -- so exciting! Just leave a comment below on this post, and I'll pick a random winner on Thursday.
Okay, let's sew!
Planetary Mini Medallion Quilt
by Heidi Staples
Finished Size: 36 1/2 x 36 1/2’’
Fabric:
|
For:
|
Cutting:
|
Fat quarter orange moon phases
|
Center star
Planet Blocks
|
Cut 4 squares 2 1/2 x 2 1/2’’
Cut 2 squares 6 1/2 x 6 1/2’’
|
Fat quarter gold space bunnies
|
Center star
Planet Blocks
|
Cut 4 rectangles 2 1/2 x 4 1/2’’
Cut 2 squares 6 1/2 x 6 1/2’’
|
1/2 yard white solid
|
Center star background
Planet blocks background
|
Cut 4 squares 2 1/2 x 2 1/2’’
Cut 4 rectangles 2 1/2 x 4 1/2’’
Cut 64 squares 2 x 2’’
|
Fat quarter dark blue bunny field
|
First border
|
Cut 4 strips 2 1/2 x 8 1/2’’
|
Fat eighth dark blue comets
|
First border corner squares
Nine patch corner block
|
Cut 4 squares 2 1/2 x 2 1/2’’
Cut 1 strip 2 1/2 x 11’’
|
Fat quarter orange space bunnies
|
Chevrons
Nine patch corner block
|
Cut 4 rectangles 2 1/2 x 4 1/2’’
Cut 8 squares 2 1/2 x 2 1/2’’
Cut 1 strip 2 1/2 x 11’’
|
3/4 yard orange floral
|
Chevrons
Binding
|
Cut 8 rectangles 2 1/2 x 4 1/2’’
Cut 16 squares 2 1/2 x 2 1/2’’
Cut 4 strips 2 1/2 x WOF
|
Fat quarter yellow bunny field
|
Chevrons
Planet blocks
Nine patch corner block
|
Cut 8 rectangles 2 1/2 x 4 1/2’’
Cut 16 squares 2 1/2 x 2 1/2’’
Cut 2 squares 6 1/2 x 6 1/2’’
Cut 1 strip 2 1/2 x 11’’
|
1 1/2 yd. yellow moon phases
|
Chevrons
Quilt Backing
|
Cut 4 rectangles 2 1/2 x 4 1/2’’
Cut 8 squares 2 1/2 x 2 1/2’’
Cut 1 square 40 x 40’’
|
Fat eighth aqua moon phases
|
Corner 4-patch blocks
Nine patch corner block
|
Cut 2 strips 2 1/2 x 11
Cut 1 strip 2 1/2 x 11’’
|
Fat eighth aqua floral
|
Corner 4-patch blocks
|
Cut 2 strips 2 1/2 x 11
|
Fat quarter pink floral
|
Second border
Nine patch corner block
|
Cut 4 strips 2 1/2 x 20 1/2’’
Cut 1 strip 2 1/2 x 11’’
|
Fat eighth pink moon phases
|
Second border corner squares
Nine patch corner block
|
Cut 4 squares 2 1/2 x 2 1/2’’
Cut 1 strip 2 1/2 x 11’’
|
Fat quarter orange comets
|
Planet blocks
|
Cut 2 squares 6 1/2 x 6 1/2’’
|
Fat quarter yellow floral
|
Nine patch corner block
|
Cut 1 strip 2 1/2 x 11’’
|
Fat quarter purple moon phases
|
Planet blocks
|
Cut 2 squares 6 1/2 x 6 1/2’’
|
Fat quarter purple floral
|
Planet blocks
|
Cut 2 squares 6 1/2 x 6 1/2’’
|
Fat quarter purple comets
|
Planet blocks
Nine patch corner block
|
Cut 2 squares 6 1/2 x 6 1/2’’
Cut 1 strip 2 1/2 x 11’’
|
Fat quarter purple bunny field
|
Planet blocks
|
Cut 2 squares 6 1/2 x 6 1/2’’
|
Fat eighth aqua space bunnies
|
Nine patch corner block
|
Cut 1 strip 2 1/2 x 11’’
|
Notes
All seams 1/4’’ unless otherwise stated.
Press seams toward darker fabric unless otherwise stated.
RST = right sides of the fabric together
WOF = width of fabric
Make the Center Star

1. Place an orange 2 1/2’’ square on top of the right end of a gold 2 1/2 x 4 1/2’’ rectangle RST. Use a pencil to trace a diagonal line on the wrong side of the orange square from the lower inside corner to the upper outside corner. Sew on that line and trim off a 1/4’’ seam. Repeat with the other 3 pairs of squares and rectangles.

2. Place a white 2 1/2’’ square on top of the left end of a gold rectangle RST. Use a pencil to trace a diagonal line on the wrong side of the white square from the upper inside corner to the lower outside corner. Sew on that line and trim off a 1/4’’ seam. Repeat with the other 3 pairs of squares and rectangles.

3. Sew a white 2 1/2 x 4 1/2’’ rectangle to the 4 1/2’’ side of a star rectangle which is half orange and half gold. Press the seams open. Repeat with the other 3 pairs of rectangles.

4. Sew the four star units together as shown in the photo above.

5. Sew 2 of the blue 2 1/2 x 8 1/2’’ border strips to the right and left sides of the star block.

6. Sew the 2 dark blue 2 1/2’’ squares to either end of one of the blue border strips. Repeat with the other remaining pieces. Sew these strips to the upper and lower edges of the star block.
Make the Chevron Border
1. Draw a diagonal line in pencil from corner to opposite corner on the wrong side of each of the squares that will be used in making the chevron blocks or simply fold the squares in half diagonally, pressing a fold line that you can use as a stitching guide.

2. Lay out your rectangles and squares as shown in the photo above. The squares paired with each rectangle will be the same fabric as the rectangle above it.

3. Sew flying geese blocks with each rectangle and pair of squares. Place a square on the right side of a rectangle RST and stitch along the drawn or folded line, trimming the seam to 1/4’’. Press the seam toward the square. Repeat with the other square on the left side of the rectangle.

4. Sew the the 6 flying geese blocks together as shown in the photo above. Use the remaining rectangles and squares to make 3 more units like this one.

5. Sew a chevron unit to the right and left sides of the center star piece, one pointing up and the other pointing down.

6. Sew a 2 1/2 x 11’’ aqua moons strip to an aqua floral strip along a long edge. Subcut the resulting strip into 4 units that measure 2 1/2 x 4 1/2’’.
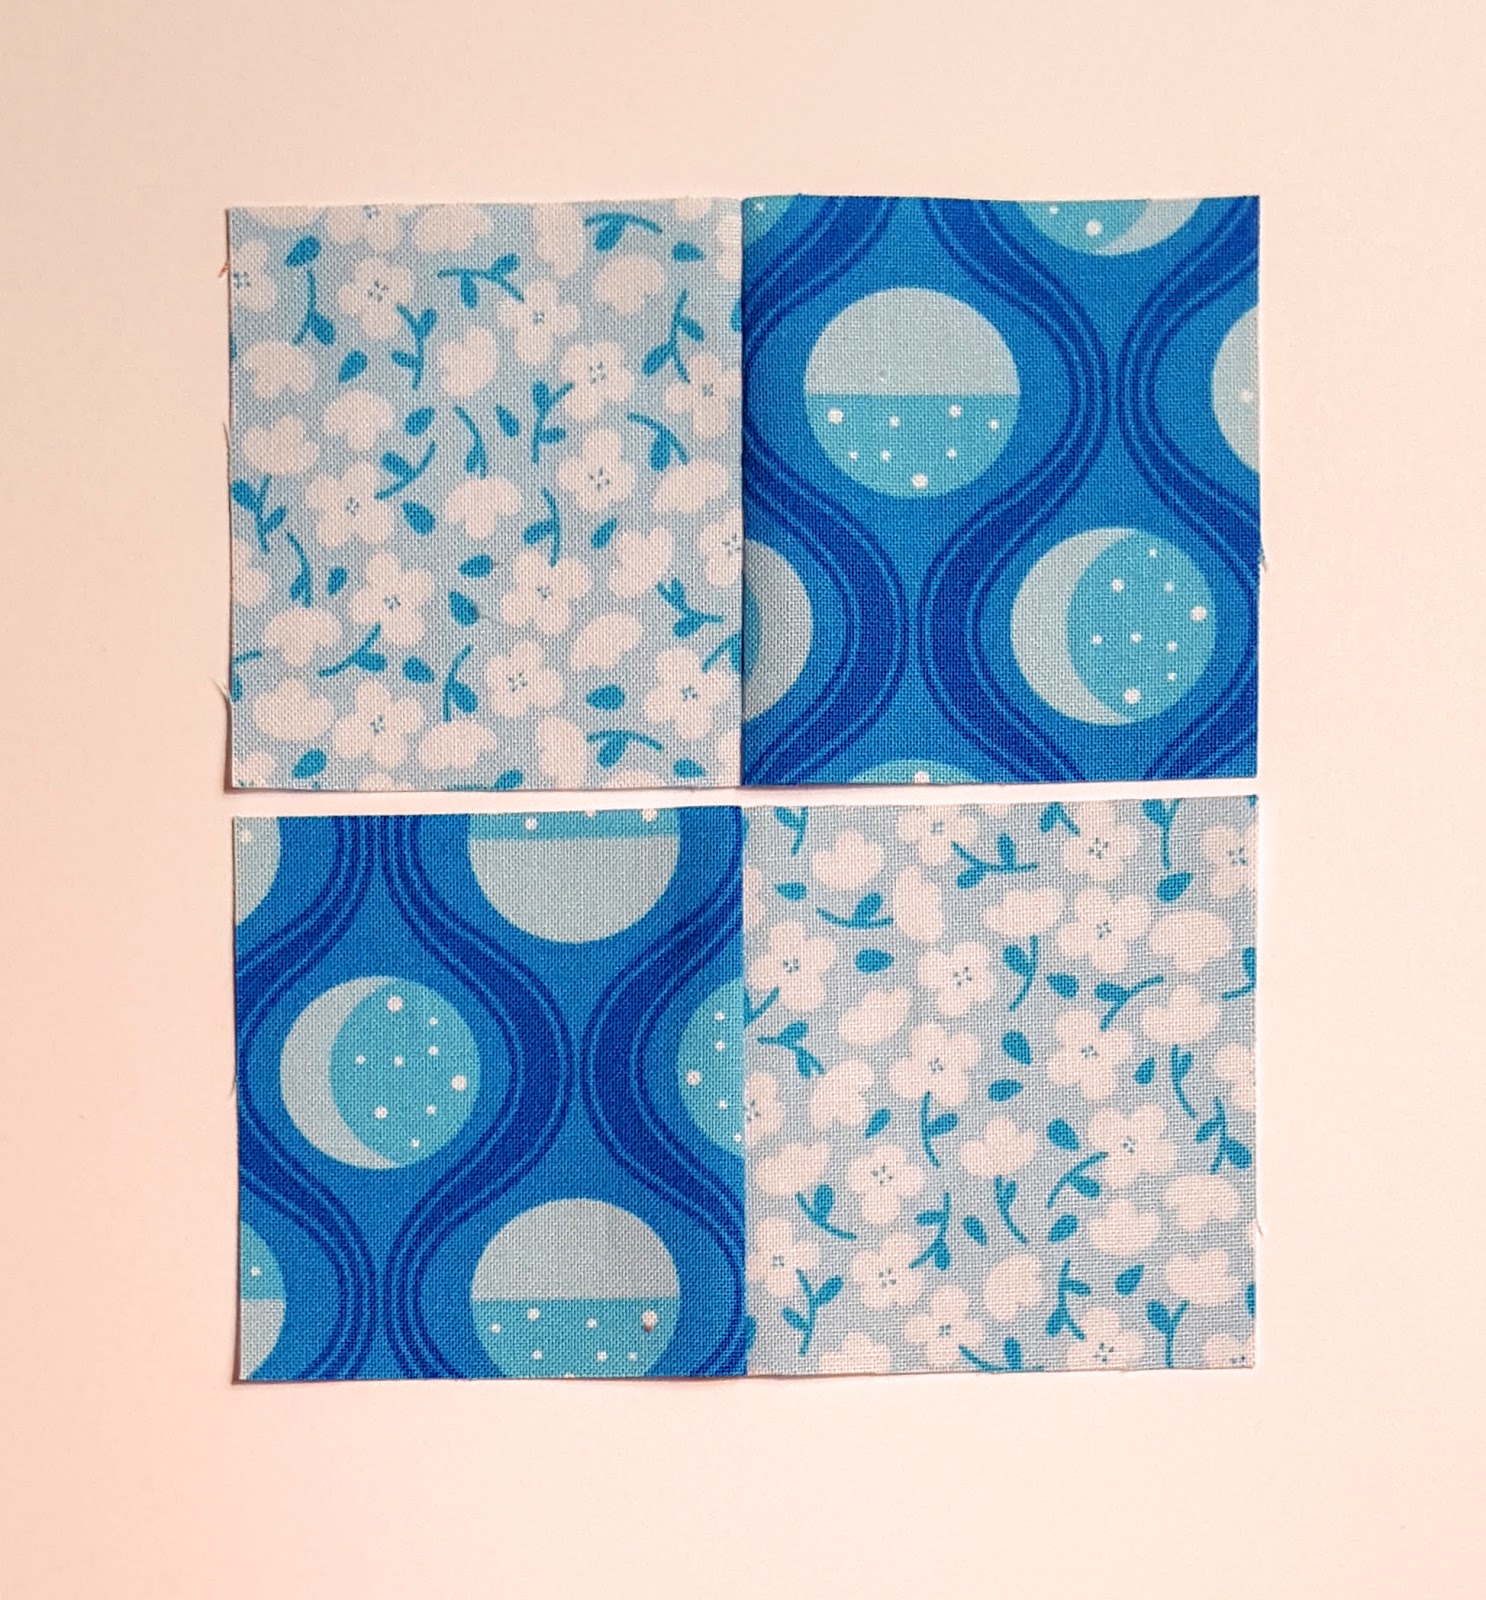
Sew the pairs together to create 4-patch blocks as shown above.

7. Sew a 4-patch unit to each end of the remaining chevron units as shown in the photo above. Sew these units to the top and bottom of the center star piece, paying attention to directionality as shown in the photo.

8. Sew a pink 2 1/2 x 20 1/2’’ floral strip to the right and left edges of the quilt.

Sew a 2 1/2” square pink moon phases block to the right and left sides of the remaining floral strips and then sew these to the top and bottom edges of the quilt.
Make the Planet Border

1. Place a white 2’’ square in the corner of one of the 6 1/2’’ planet squares, tracing and stitching a diagonal line to cut across the corner. Trim the seam to 1/4’’ and press away from the corner. Repeat with the other 3 corners.

2. Repeat step 1 with the other 11 planet squares and 44 white corner squares until you have 12 planet blocks.

3. Arrange the planet blocks in rows of 4 and sew them together.

Sew a row of four blocks to each of the left and right edges of your quilt.
Make the Nine Patch Corner Blocks

1. Arrange the 9-patch strips into 3 groups of 3 and sew them together along the long sides.

2. Cut each 9-patch slab into 4 pieces, 2 1/2” wide.

3. Arrange the pieces into 4 9-patch blocks and sew together.
4. Sew a 9-patch block at the each end of the remaining 2 rows of planetary blocks, and then sew those onto the remaining top and bottom edges of your quilt.
Finish the Quilt
1. Make your quilt sandwich by stacking in this order from bottom to top: quilting backing (right side down), batting, and quilt top (right side up). Baste together with pins or adhesive basting spray and quilt as desired. Trim off excess batting and backing.
2. Bind your quilt (see my links page if you need help with this step), wash, and enjoy!
Be sure to check out the other stops for the tour this week:
Sept. 19 - Fabric Mutt
Sept. 20th - Bryan House Quilts
Sept. 21st - Stars & Sunshine
Sept. 22nd - Modern Sewciety
Sept. 23rd - Sew Scatterbrained
Happy sewing!


