Tuesday, April 26, 2016

Tutorial Correction


My deepest apologies to those of you who attempted making the Pixie Cup this weekend and were confused by the results. A helpful reader pointed out the problem to me today, and yes, there is quite a difference between 19" (which I typed by mistake) and 13". When I do the math for a new tutorial, I usually have an index card full of scribbled notes and numbers, and every once in a while, I mix something up as I'm writing out the instructions for the project. Usually I'm able to catch it before it gets published on the blog, but this time it got past me. So sorry. Everything should be in order now, but don't hesitate to ask if you ever have questions.

Thanks, friends!

Saturday, April 23, 2016

The Pixie Cup Tutorial

The Pixie Cup Tutorial by Heidi Staples of Fabric Mutt

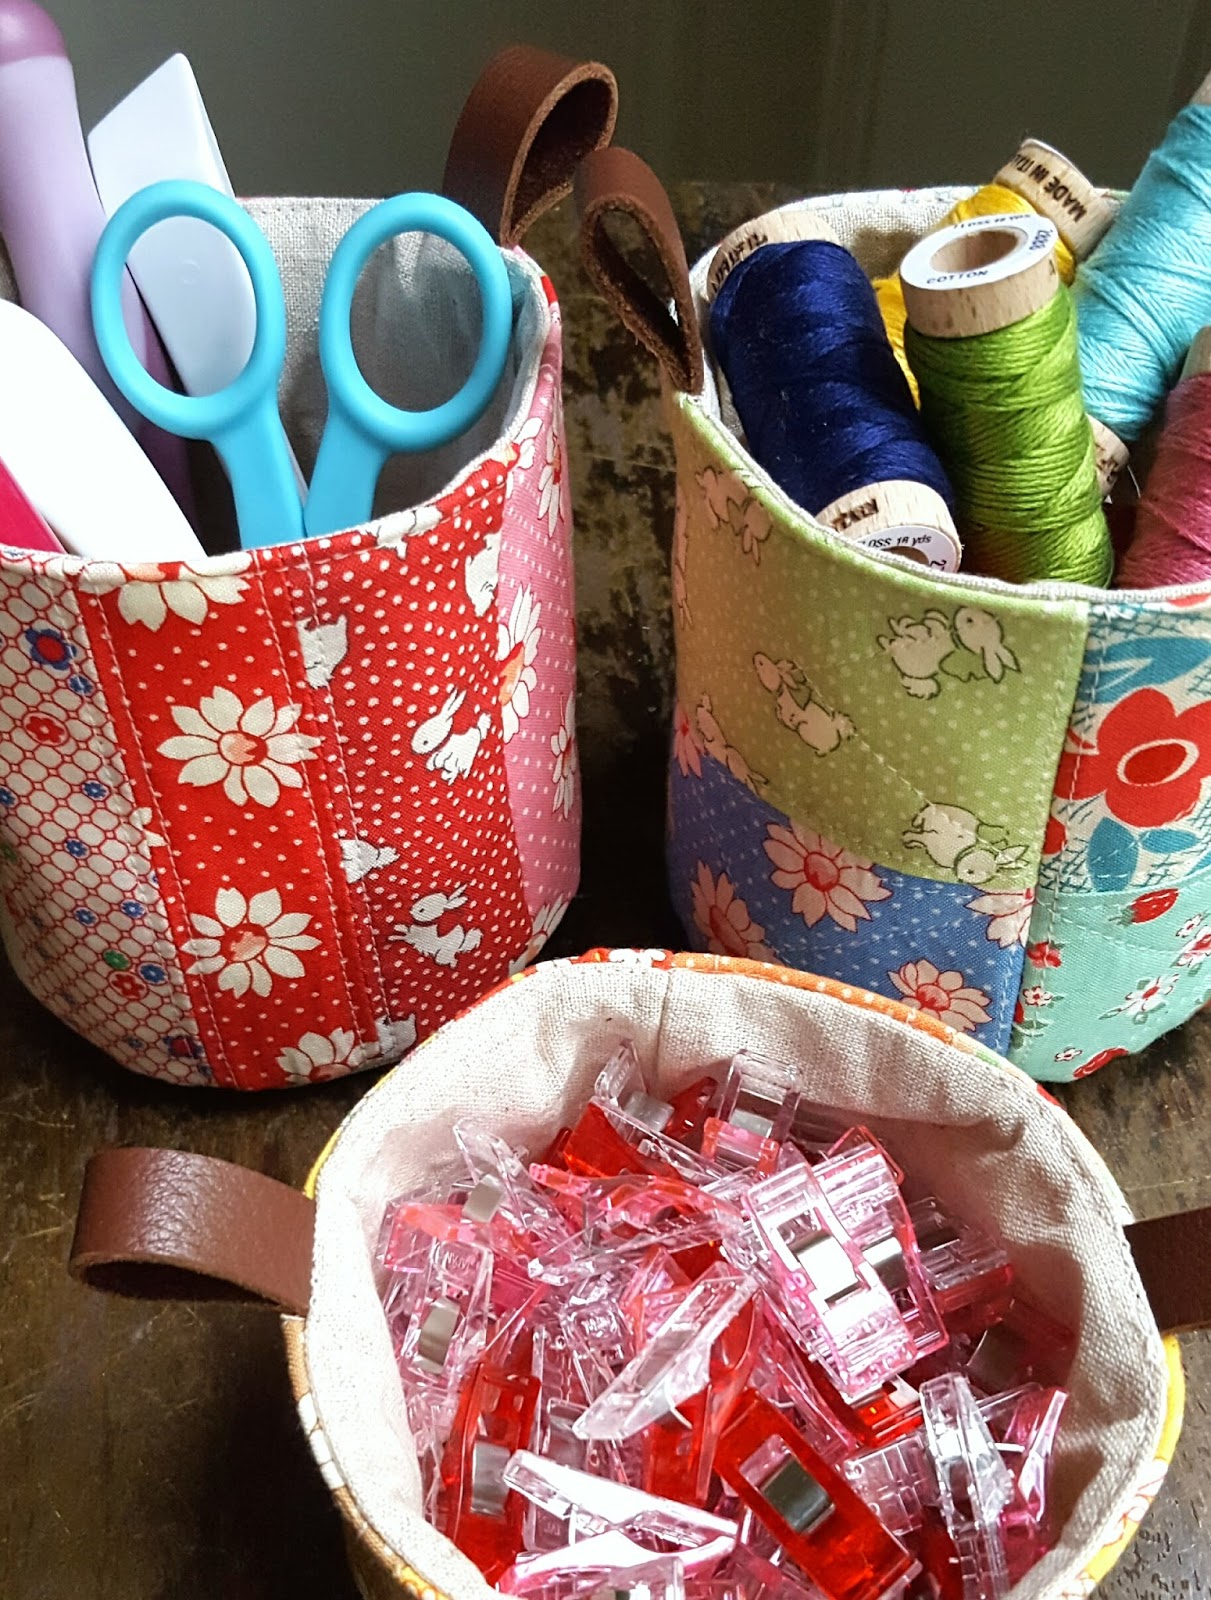
By popular request, I'm sharing the Pixie Cup Tutorial with you today! These are similar enough to my Pixie Basket tutorial that I thought they ought to share the name, but there are definitely differences.

The Pixie Cup Tutorial by Heidi Staples of Fabric Mutt

Keep in mind that when you're working with curves, things are always a little trickier. Go slowly while you're sewing a side piece to a circle piece and don't let it worry you. Here's a great tutorial for this type of sewing, even with ideas for getting the math right if you want to make your circle larger. Honestly, I didn't really do anything fancy while sewing those curves on my cups -- no pins, no clipping, no trimming the seam -- and everyone lived happily ever after. But if you feel better taking these steps, then by all means, do it!


You'll notice from this picture inside the cup that everything doesn't lie perfectly flat. Wrinkles are normal, especially when you're using linen. The inside opening can either be sealed up by machine or hand stitching. I tried it both ways and found that, as usual, machine stitching is faster while hand stitching is neater. Go with what you prefer. Since you're going to fill this cup with something useful or pretty, odds are pretty good that no one's ever going to see that seam anyway.

I've included dimensions for both sizes of basket: short and tall. The patchwork can be whatever you want as long as it fits in the exterior panel rectangle. I give you one patchwork square size option for each version just to get you started. It's also perfectly fine to just use a single piece of fabric instead.

Please do share pictures of your finished cups on social media -- I always love to see your projects! You can tag these #pixiecup (remember -- different from the #pixiebasket!) and be sure to tag me @fabricmutt. Since I've been getting a lot of questions from people about using these projects for classes, retreats, and pop-up shops, I've also added a Frequently Asked Questions section to my tutorials page where you can find all the answers.

Okay, let's sew!

Materials & Cutting

Tall Version
1 rectangle 4 1/2 x 13" of fabric for exterior panel (patchwork option: 8 rectangles 2 1/2 x 3 1/2" each)
1 rectangle 4 1/2 x 13" of batting for exterior interfacing
1 rectangle 4 1/2 x 13" of linen for lining
1 rectangle 4 1/2 x 13" of fusible interfacing (I use Pellon Craft Fuse) for lining interfacing
2 circles 4" diameter of linen for exterior and lining base pieces
1 circle 4" diameter of batting for exterior base interfacing
1 circle 4" diameter of fusible interfacing (I use Pellon Craft Fuse) for lining base interfacing
2 strips 1/2 x 3" of leather for handles (other options: twill tape, double fold bias tape)

Short Version
1 rectangle 2 1/2 x 13" of fabric for exterior panel (patchwork option: 8 rectangles 2 x 2 1/2" each -- you'll sew the 2 1/2" sides together)
1 rectangle 2 1/2 x 13" of batting for exterior interfacing
1 rectangle 2 1/2 x 13" of linen for lining
1 rectangle 2 1/2 x 13" of fusible interfacing (I use Pellon Craft Fuse) for lining interfacing
2 circles 4" diameter of linen for exterior and lining base pieces
1 circle 4" diameter of batting for exterior base interfacing
1 circle 4" diameter of fusible interfacing (I use Pellon Craft Fuse) for lining base interfacing
2 strips 1/2 x 3" of leather for handles (other options: twill tape, double fold bias tape)

Other Supplies
Adhesive basting spray
Thread & needle (if hand sewing the opening closed)
Chopstick or knitting needle
Binding clips

Note: all seams are 1/4" unless otherwise stated.

Instructions


1. Sew together any patchwork pieces. Use adhesive basting spray to fuse the wrong side of your exterior panel piece to the batting rectangle and trim down to the size of the exterior panel (depending on which version you're making). Quilt as desired.


2. Fold the leather pieces in half, wrong sides together, and stitch 1/8" from the raw edges. Line up the raw edges on the top edge, about 3 1/2 inches from each side edge of the rectangle (see above).


Baste in place.


3. Use adhesive basting spray to fuse the wrong side (if there is one) of one linen circle to the batting circle -- or to a 4 1/2" square that you will later cut down into a circle. Quilt as desired.


4. Place the exterior rectangle on top of the exterior base, right sides together, lining up the bottom edge of the rectangle on the side of the circle. Starting 1-2" from the short end of the rectangle, carefully sew the lower edge of the rectangle to the outside edge of the base, stopping about 1-2" before the other short end of the rectangle.


5. Match up the two short ends of the rectangle, right sides together, and sew them together. Then carefully finish sewing the rectangle piece to the circular base. Turn the exterior piece right side out and set aside.


6. Follow the manufacturer's instructions to fuse the wrong sides of the lining rectangle and lining base to the coordinating interfacing pieces. Repeat what you did in steps 4 and 5, using the lining pieces, but this time, do not finish sewing the rectangle piece to the circular base. Leave a gap of 2-4" for turning and leave the piece inside out.


7. Place the exterior inside the lining, right sides together, and clip them together along the top.


Carefully sew all the way around the top opening.

8. Reach in through the hole in the lining and pull out the exterior of the cup, pressing carefully with your iron. Push out the all the edges of the exterior by gently poking a knitting needle or chopstick through the hole in the lining. Stitch the opening in the lining closed either by machine or by hand. This is probably the trickiest spot for sewing around curves, so here I did find it helpful to use binding clips to hold the edges together, removing them one by one as I stitched it up.

The Pixie Cup Tutorial by Heidi Staples of Fabric Mutt

9. Push the lining down into the cup and topstitch all the way around the opening.

Fill with goodies and enjoy!

Thursday, April 21, 2016

Strawberry Biscuit Blog Hop


I've been looking forward to today's post for so long!


You all know how much I love Elea Lutz's new Strawberry Biscuit collection for Penny Rose Fabrics. I shared my thoughts on her adorable fabric as well as this version of my Stationery Kit tutorial a while back, which I turned into a sewing kit. It's sitting on my bedside table as I type this post, and I love it so much!


But for my stop on the Strawberry Biscuit Blog Tour, I wanted to make a quilt for my girls. They're forever having tea parties with their dolls in our loft, usually pulling a few quilts from the basket I keep near their library for the occasion. I couldn't imagine a more perfect fabric to use for a tea party picnic quilt than this collection. They were so excited about it that my two youngest daughters insisted on keeping me company while I was basting the other day. How I love these girls...


For my pattern, I chose the Scrappy Bear Paw Quilt by Rita of Red Pepper Quilts. (If you don't follow her blog, you need to head over there right now and see what you've been missing. Rita is brilliant in every way!) This tutorial has long been on my Must Make list. I pulled in some Riley Blake low volume dots which paired beautifully with the candy colors of Elea's collection. My quilting is simple, just 1/4" on either side of the seams joining the 36 blocks together. The quilt is backed in a light green print covered in frolicking animals, and I bound it in a cheater print which gives the impression of a scrappy binding.


It's been pouring rain here for most of the week, but the sun came out a bit so that I could take pictures of my quilt hung over the fence surrounding our neighbors' pasture. Spring is filling the air with puffy clouds and the fields with wildflowers. Our first taste of spring in the Texas hill country has been just beautiful, and I'm falling in love with this place more every day.


Be sure to visit my sweet friend Minki today also for her stop on the tour. And tomorrow you'll have to pop over to see what Gina and Kristyne are making. These girls are all so talented! There's lots of Strawberry Biscuit goodness to go around for the next two weeks. So many thanks to Elea and Penny Rose for making it all possible!

Happy sewing!

Tuesday, April 19, 2016

Mini Patchwork Buckets (& Giveaway!)

Lecien scrappy mini patchwork buckets by Heidi Staples of Fabric Mutt

For a while I've been wanting to try making some patchwork buckets, and then I thought, why not make tiny ones? When a glorious stack of Retro 30's Child Smile by Lecien landed in my mailbox (courtesy of the lovely people at Fat Quarter Shop who asked if they could sponsor a few of my blog posts), I could resist no longer.


These sweet little buckets -- what can I say? I love them. Scrappy patchwork, retro prints, linen lining, leather handles...it's all my favorite things rolled into one project. The two sizes are 2" and 4" tall, both wrapped around a 3 1/2" diameter circle. They're the perfect size for holding sewing tools, thread spools, binding clips, colored pencils, makeup brushes, clothespins, lollipops, [insert the name of your favorite small item here].

Lecien scrappy mini patchwork buckets by Heidi Staples of Fabric Mutt

There's no doubt that the adorable prints are the star of the show. You know I love anything with a vintage spin to it, and these are darling. But can we talk about the supporting cast for a minute? When you're looking for a neutral to pair with colorful patchwork, linen is always a good idea. I used Soft Sand Linen Blend from the Art Gallery Fabrics Denim Studio collection, which is fabulous (as is the rest of that collection, by the way). And I'm constantly amazed at how adding the tiniest leather accents to any project immediately takes it up to the next level. I cut these 1/2" wide handles from a piece of leather I ordered on Amazon. You could easily substitute twill tape or double fold bias tape, but I love the way these look.


My friends at Fat Quarter Shop want to share some fabric with you too (aren't they sweet!), so they're letting me give away a package of Retro 30's Child Smile to one reader. You even get to choose between origami squares (10" squares) or a sushi roll (2 1/2" wide strips). Leave me a comment below letting me know which you'd rather have, and I'll choose a winner on Friday morning. International entries are welcome. Be sure to leave your email address in the comment if you're a no-reply blogger so that I can get in touch with you!

Happy week to you, friends!

**NOTE: This giveaway is now closed! Congratulations, Karen!**

Monday, April 11, 2016

7 Tips for Planning Your Next Project

7 Tips for Planning Your Next Project by Heidi Staples of Fabric Mutt

Every project has to start somewhere. The time spent planning your next work of art is arguably the most important part of the creative process. This is where you’ll decide what you want to make, why you’re making it, and how you’ll do it. Here are seven ideas for getting the most out of your next sewing project design session...

1. Have a resource library.

Whether you design your own projects or enjoy working from ready made patterns, it helps to have a library full of ideas to get you started. This can include books, magazines, patterns, blogs, websites, online idea boards, or a set of bookmarks on your computer. Having these resources at hand helps me when…
  • I want a pattern that’s ready to go quickly.
  • I need help with a specific technique.
  • I’m stuck for ideas and need inspiration.

Keep in mind that you don’t have to limit yourself to sewing publications. I’m tremendously inspired by works about interior decorating, travel, architecture, fashion, general crafting, and vintage design. You are the curator of your library, so choose items that are important, useful, and meaningful to you.

7 Tips for Planning Your Next Project by Heidi Staples of Fabric Mutt

2. Be a librarian.

Have a system for keeping your print items in order. Bookshelves are the most obvious solution for stashing your books and magazines, but wooden crates, heavy wire bins, and magazine files work too. I use all of the above options for different types of publications.

Patterns are also a part of your library, and there are plenty of ways to organize them. Keep each one in a separate file folder, school portfolio, manilla envelope, or clear plastic bag. Any of these options will fit neatly inside a wire basket or file box, where they’ll be ready when you need them.

3. Know what you like.

When you’re deciding what to sew next, be honest with yourself about what you like to make. We all have projects in our past that we started for some reason but abandoned because they just didn’t work for us. When this happens a lot, it can be frustrating to see that stack of unfinished projects.

The longer you sew, the more you’ll know what kind of projects you do best, and this will help you be both practical and thoughtful when choosing a project. Also remember that your tastes are going to change over time. The artist you are today is not the one you were even a year ago. You may find that projects, quilting styles, fabrics, or colors that once excited you, now seem to have lost their appeal. This is completely normal. Sometimes you’ll be surprised to find yourself falling in love with those items all over again later on, but if not, you can always pass them on to others who will be happy to give them a new home. Just remember that there’s no greater waste than investing time in projects you don’t love just because you think you’re supposed to.

4. Stretch yourself.

Don’t be afraid to try something new once in a while. This is how you grow. I’ve found that many things I was once afraid to try (zippers, bags, hexagons) became favorite projects, many of which opened up great opportunities for me. And even if you don’t end up loving that new technique, you’ve still gained valuable experience.


5. Stock an art station.

Keep a set of art supplies on hand so that you can capture ideas when you think of them. My workspace is always stocked with pencils, erasers, colored pencils, a ruler, graph paper, and unlined paper. I can’t tell you how many times I’ve run to my desk so that I can sketch out a design before it disappears from my head. Having these materials nearby is so helpful when inspiration strikes.

7 Tips for Planning Your Next Project by Heidi Staples of Fabric Mutt

6. Choose your fabrics thoughtfully.

Are you going for a wild and crazy mix of prints and colors? Is this project for a child or an adult? Should you stick to a color palette? Having all these questions settled in your mind before you start pulling the fabric out of your cabinet will keep you focused when you're making decisions later on.

Also remember that if you don’t love it now, you won’t love it later. This applies to pretty much everything in the sewing process, including the prints you choose. Don’t start sewing until you love the fabric stack in front of you. Too often I've ignored that little voice in my head that said, "I'm not sure I like this" and lived to regret it...every single time.

7. Practice.

Scientist Linus Pauling once said, "The best way to have a good idea is to have a lot of ideas." It's so true. Designing projects, choosing winning fabric combinations -- these things take time and practice. The more you do it, the more you'll feel comfortable with what you like. Keep practicing every week and, if possible, keep a record of your work through a notebook, blog, or social media account. When you look back over that creative journey, you'll be surprised at how far you've come.

How do you choose your sewing projects? Do you prefer to work with ready made patterns, do you like designing your own, or a little of both? Any tips for the design table?
Related Posts Plugin for WordPress, Blogger...